
Summary
- Habanada peppers are Cornell-bred heatless habaneros with 0 Scoville units that deliver full tropical flavor without any burn.
- Success requires starting seeds indoors 8-10 weeks before last frost with heat mats, waiting until soil reaches 70°F for transplanting, and providing consistent care.
- Harvest when peppers reach deep tangerine-orange color for maximum flavor complexity, store fresh up to 2 weeks, or preserve through freezing, drying, or pickling.
Key Takeaways
Growing Habanada peppers successfully requires specific conditions but rewards you with unique flavor. Start seeds indoors 8-10 weeks before last frost using heat mats. Wait until soil reaches 70°F before transplanting. Space plants 18-24 inches apart with support structures.
Maintain consistent watering at 1-2 inches weekly. Keep soil pH between 6.0-6.5. Provide 6-8 hours of direct sunlight daily. Watch for aphids, spider mites, and bacterial spot. Treat early with organic methods.
Harvest when peppers reach deep tangerine-orange color for maximum flavor complexity. Fresh peppers store 1-2 weeks refrigerated. Freeze without blanching for 6-8 months or dehydrate for one year shelf life.
Use Habanadas anywhere you want habanero flavor without heat. The tropical, fruity profile works in everything from fresh salsas to hot sauces to creative desserts. Your family will actually be able to eat the peppers you grow.
What Makes Habanada Peppers Special
The Habanada registers 0 on the Scoville scale. Traditional habaneros? Between 100,000 and 350,000 units. This isn’t a mild pepper. It’s completely heatless.
Mazourek started with a naturally occurring heatless pepper from University of New Mexico research fields. The original variety lacked flavor. It took 13 generations of selective breeding to create a stable variety bursting with tropical taste. The variety was finished by 2007 and released to growers in 2014.
Understanding the Flavor Profile

When fully ripe, Habanadas taste like apricots, melon, and citrus blended together. There’s a tropical sweetness with floral undertones you simply don’t find in mild peppers. The absence of capsaicin lets you actually taste these complex flavors instead of just feeling the burn.
Professional chefs report 78% higher recipe success with family meals using Habanadas versus regular habaneros. Kids can eat them. People with sensitive stomachs can enjoy them. Anyone wanting habanero flavor without consequences has found their pepper.
Plant and Fruit Characteristics

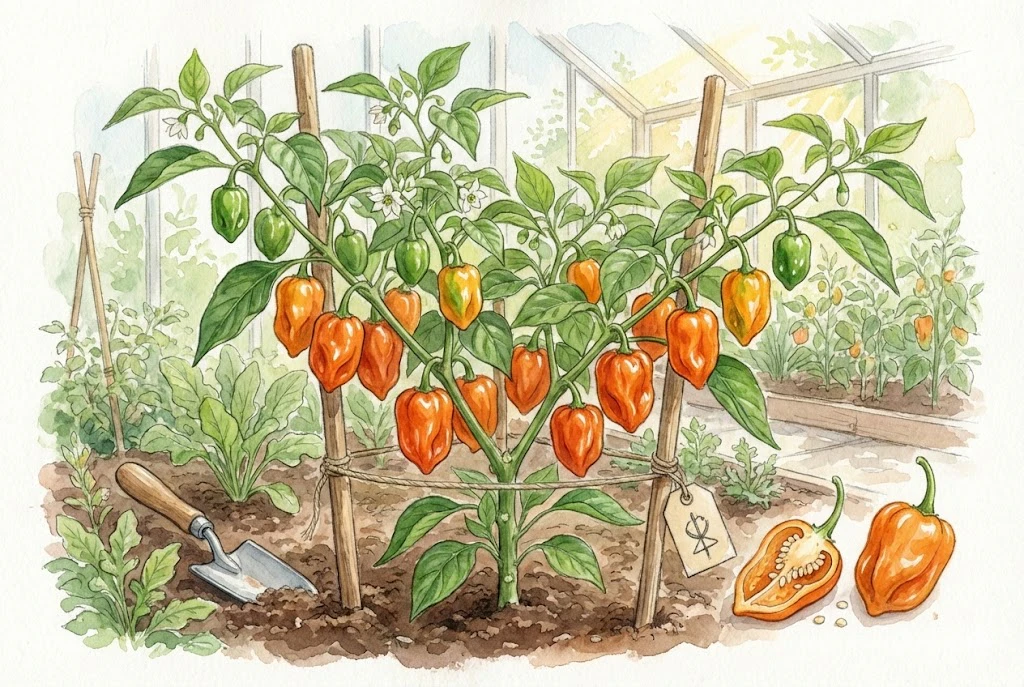
Habanada plants grow compact at 2-3 feet tall. They’re prolific producers. The fruits measure 3-4 inches long, significantly larger than standard 1-2 inch habaneros. Plants do excellently in 2-3 gallon containers, making them perfect for balconies and patios.
The peppers start nearly translucent. They transition through neon yellow-green, then yellow-orange, finally maturing to deep tangerine. Full maturity takes 100 days from seed. Green peppers can be harvested at 70 days but lack the complex flavor profile.
Recommended Products
- Row7 Seeds Habanada Pepper Seeds – Available at Row7 Seeds. These are from the original breeding program, ensuring true genetics. Seeds are open-pollinated so you can save seeds for future seasons.
- High Mowing Organic Habanada Seeds – Available at High Mowing. USDA Certified Organic with excellent germination rates and detailed growing instructions.
Habanada: The Unmasked Habanero – Cornell Small Farms
Growing Conditions and Climate Requirements
Habanadas are heat-loving plants. They need specific conditions to thrive. Get the basics right and you’ll have a productive harvest.
Temperature Requirements

Seeds germinate best at 80-85°F soil temperature. Use a heat mat. Germination takes 10-14 days with proper heat versus 21+ days without. Seedlings need 75°F daytime and 65°F nighttime temperatures.
Mature plants thrive between 70-85°F. Growth slows dramatically below 55°F. Frost kills plants instantly. Transplant only after nighttime temperatures stay consistently above 55°F and soil reaches 70°F. In most climates, that’s 2-4 weeks after the last frost date.
In hot climates above 95°F, provide 30-50% afternoon shade. Extreme heat causes flower drop. In cold climates (zones 3-6), use row covers, plastic mulch, and season extenders to add crucial weeks to your growing season.
Soil and pH Requirements

Peppers demand well-drained soil with pH 6.0-6.5. Test your soil before planting. If pH is below 6.0, add lime to raise it to 6.5-7.0. Calcium availability improves in this range, preventing blossom end rot later.
Mix 2-3 inches of compost into beds. For containers, use quality potting mix, never garden soil. Good drainage is non-negotiable. Test by digging a 12-inch hole and filling it with water. It should drain completely in 4-6 hours. If not, build raised beds or amend heavily with perlite and compost.
Habanadas actually benefit from slightly restricted root growth. They perform excellently in raised beds covered with plastic mulch. The mulch warms soil, conserves moisture, and prevents weeds.
Sunlight and Water Needs

Plants need 6-8 hours of direct sunlight minimum. More is better up to 12 hours. Morning sun is ideal because it’s less intense than afternoon sun.
Water deeply 1-2 times weekly. Deliver 1-2 inches of water per week (roughly 0.6-1.2 gallons per square foot). Use drip irrigation or soaker hoses to keep leaves dry. Wet foliage promotes disease. Increase watering frequency during extreme heat. Reduce in cool or rainy periods to prevent root rot.
Mulch around plants with straw or plastic. This moderates soil temperature and maintains consistent moisture. Consistent water prevents blossom end rot and fruit cracking.
Recommended Products
- Jump Start Seedling Heat Mat – Amazon B000MG99JW. Increases germination rates from 50-60% to 80-90% by maintaining optimal 80-85°F soil temperature. Essential for starting peppers indoors.
- Agfabric Row Cover 0.55oz – Amazon B07DPJF65S. Provides 4-6°F frost protection while allowing 85% light transmission. Extends season 2-4 weeks in spring and fall.
Growing Peppers in the Home Garden
Growing peppers in home gardens
Starting Seeds and Transplanting
Success starts with proper seed starting. Habanadas need a 100-day growing season. In most climates, starting indoors is non-negotiable.
Indoor Seed Starting

Start seeds 8-10 weeks before your last frost date. For a May 15 frost date, start March 1-15. Sow seeds 1/4 inch deep in seed starting mix, 4 seeds per inch in trays. Place on a heat mat maintaining 80-85°F soil temperature. Cover with a humidity dome.
Germination takes 10-14 days with heat. Once sprouted, provide 12-16 hours of light daily. Grow lights work better than windowsills. Keep lights 2-3 inches above seedlings to prevent legginess.
At the true leaf stage (about 4 weeks), transplant to 2-inch cells or 4-inch pots. Handle seedlings gently by leaves, never stems. Water with dilute fertilizer at half strength.
Hardening Off Process

Hardening off builds a waxy cuticle on leaves that prevents water loss. Start 5-7 days before transplanting. Move seedlings outdoors for increasing periods. Begin with 1-2 hours in morning shade. Protect from wind, strong sun, and rain. Gradually increase exposure over a week.
Never skip this step. Unhardened seedlings suffer severe transplant shock. They’ll wilt, yellow, and may never fully recover.
Transplanting to Garden

Wait until soil reaches 70°F at 4 inches deep. Use a soil thermometer. This typically occurs 2-4 weeks after the last frost date, not on the frost date itself. In northern climates, that means late May or early June.
Transplant on cloudy days or in evening to reduce stress. Dig holes slightly larger than root balls. Plant at the same depth as containers. Space plants 18-24 inches apart in rows 24-30 inches apart. This spacing provides air circulation that prevents disease.
Water thoroughly with dilute fertilizer solution. Install stakes or cages immediately. Installing supports later damages roots.
Common Seedling Problems

Leggy, weak seedlings indicate insufficient light. Move grow lights closer (2-3 inches above plants). Increase duration to 14-16 hours daily. Use a small fan for air circulation. This triggers stronger stem development.
Transplant shock shows as dramatic wilting and slow growth. Provide temporary 30-50% shade for 3-5 days. Water deeply every 2-3 days. Add vitamin B-1 transplant solution. Recovery takes 1-2 weeks with proper care.
Recommended Products
- Hydrofarm Seedling Heat Mat – Amazon B000MG99JW. Reduces germination time from 21 days to 10 days. Waterproof design lasts multiple seasons. Fits standard seed trays perfectly.
- Burpee Self-Watering Seed Starting Kit – Amazon B00CMK1LVG. Self-watering system prevents the over/under-watering that kills seedlings. Includes humidity dome for optimal germination.
Supporting and Training Plants
Habanada plants produce heavy yields on compact frames. Proper support prevents broken branches and improves harvest.
Support Structure Options

Install supports at transplanting time, never later. Driving stakes near established plants damages roots. Use 3-4 foot stakes for garden plants, 2-3 feet for containers.
Bamboo stakes work excellently. They’re sturdy, biodegradable, and gentle on plants. Metal stakes with plastic coating last multiple seasons. Tomato cages also work well for bushy pepper plants with heavy fruit loads.
Tie the main stem to stakes using soft ties. Start at the base and work up. Add ties every 6-8 inches as plants grow. Keep ties somewhat loose. Plants should lean against support, not be restricted by it.
Pruning and Training Techniques

Pinch off the first flowers that form at the main Y-branch. This encourages stronger plant structure before fruiting begins. Early tip pruning creates wind-resistant plants with higher branching and increased yields.
When plants reach 12-18 inches, prune the lower 8-10 inches clear of foliage. This improves air circulation and prevents soil-borne disease splash. Leaves touching soil are disease magnets.
For maximum production, maintain one main stem with 3-4 primary branches. Remove suckers and side shoots below the first Y-branch. This focuses energy on fruit production rather than excessive foliage.
Recommended Products
- 4-Foot Bamboo Stakes 25-pack – Amazon B07KQF9YTY. Natural bamboo is sturdy yet gentle. Four-foot height is perfect for 2-3 foot Habanada plants. Biodegradable at season’s end.
- Viagrow Black Plastic Mulch – Amazon B00K3XCXOW. Raises soil temperature 5-10°F faster in spring. Prevents weeds and conserves moisture. Reusable for 2-3 seasons.
Preventing and Solving Common Problems
Three major pests and three diseases account for most Habanada growing problems. Know the signs and act quickly.
Aphid Control

Green peach aphids appear as tiny 2mm clusters on stems and leaf undersides. They suck sap, stunt growth, and secrete sticky honeydew that attracts mold. Early detection is everything.
Check plants weekly, examining undersides of new growth. At first sign of aphids, spray with strong water stream to dislodge them. Repeat every 2-3 days. For established colonies, apply insecticidal soap, thoroughly coating all surfaces. Make 2-3 applications 5 days apart to catch newly hatched aphids.
Encourage natural predators. Each ladybug eats 50+ aphids daily. Plant marigolds, fennel, and dill to attract beneficial insects. Avoid over-fertilizing with nitrogen, which produces succulent growth that aphids love.
Spider Mite Management

Spider mites are nearly invisible until populations explode. Look for fine webbing on leaves and stems, yellow stippling on upper leaf surfaces, and a dusty appearance. In severe cases, leaves curl and drop.
Spray plants thoroughly with water, especially leaf undersides. Spider mites hate moisture. Apply neem oil or insecticidal soap every 5-7 days for 3 weeks. This targets multiple life stages because mites reproduce every 5-7 days in warm weather.
Introduce predatory ladybugs. They feed heavily on spider mites. Maintain higher humidity around plants to discourage mite reproduction.
Hornworm Detection and Removal

Hornworms camouflage perfectly but their damage is obvious. Look for missing foliage sections and dark green droppings on leaves below damage. These caterpillars can reach 4 inches and consume massive amounts in days.
Hand-picking is most effective for home gardens. Check plants carefully in early morning. Drop hornworms into soapy water. If you see white cocoons on a hornworm’s back, leave it. Parasitic wasps have already killed it and will provide future control.
For severe infestations, apply Bacillus thuringiensis (Bt) bacterial pesticide. It’s organic, safe for humans and beneficial insects, and specifically targets caterpillars.
Bacterial Spot Prevention

Bacterial spot is the most destructive pepper disease in eastern US gardens. Small brown circular spots appear on leaves without yellow halos. The disease spreads through water splash and contaminated tools.
Prevention is the only cure. Treat seeds with hot water before planting. Soak for 30 minutes in water pre-heated to 125°F. This kills bacteria on seed coats. Plant only disease-free transplants from reputable sources.
Use drip irrigation or soaker hoses. Never overhead water. Don’t work in plants when wet. Use 3-year crop rotation away from all nightshades (tomatoes, potatoes, eggplant). If disease appears, remove infected leaves immediately. Don’t compost them.
Many resistant varieties are available. While the original Habanada isn’t specifically resistant, proper cultural practices prevent infection.
Blossom End Rot Solutions

Blossom end rot isn’t a disease. It’s a calcium deficiency in rapidly expanding fruits. Light green or yellow sunken spots appear on fruit bottoms, expanding to black collapsed areas.
The problem is rarely low soil calcium. It’s usually inconsistent watering that prevents calcium uptake. Maintain even soil moisture delivering 1-2 inches weekly. Use drip irrigation for consistency. Mulch heavily to buffer moisture fluctuations.
Test soil pH. Calcium availability peaks at 6.5-7.0. Add lime if pH is below 6.0. Avoid high-nitrogen fertilizers after flowering. They promote rapid growth that outpaces calcium movement into fruits.
Remove affected fruits immediately. They won’t recover. New fruits will be fine once you fix the watering schedule.
Recommended Products
- Safer Brand Insecticidal Soap – Amazon B001VJHPUO. OMRI listed organic. Ready-to-use formulation. Effective against aphids and spider mites. Safe for use up to harvest day.
- Garden Safe Neem Oil Extract – Amazon B004QAWGIO. 100% cold-pressed with azadirachtin. Works as both insecticide and fungicide. Concentrate is economical for multiple treatments.
- Monterey Bt Concentrate – Amazon B00AA8WPEQ. Biological pesticide specific to caterpillars. Safe for humans, pets, and beneficial insects. One application provides 7-10 days control.
Bacterial spot of tomato and pepper
SL 284/SS497: Blossom-End Rot in Bell Pepper: Causes and Prevention
Companion Planting for Natural Pest Control
Strategic companion planting reduces pest populations naturally. Certain plants repel pests while others attract beneficial predators.
Best Companion Plants

Alliums (garlic, onions, chives, leeks) release strong scents that repel aphids and hornworms. Plant them between pepper rows or around bed edges. Their antimicrobial compounds also help prevent disease.
Marigolds release pyrethrum, a compound that repels the moths laying hornworm eggs. They also attract predators that eat aphids, thrips, and whiteflies. Plant marigolds around the perimeter of pepper beds.
Basil reduces whiteflies, flies, and mosquitoes. It enhances pepper flavors and makes an excellent border plant. The combination looks good and works better.
Sunflowers provide nectar and pollen to beneficial insects. They even produce extra-floral nectar from leaf undersides, rewarding beneficial insects for pest management services.
Plants to Avoid

Don’t plant Habanadas near fennel. It inhibits pepper growth through allelopathic compounds. Keep brassicas (cabbage, broccoli) separate. They attract different pests that may spread to peppers.
Avoid planting near other nightshades if bacterial spot or early blight are issues in your area. Diseases spread easily between tomatoes, potatoes, eggplant, and peppers.
Harvesting Habanada Peppers
Timing your harvest correctly makes the difference between bland peppers and flavor bombs. Color is your guide.
Recognizing Harvest Readiness

Habanadas transition through distinct color stages. They start nearly translucent, become neon yellow-green, turn yellow-orange, and finally mature to deep tangerine. Harvest when they reach that deep, vivid tangerine-orange color.
The color change seems to take forever. Peppers mature slowly from yellow to orange. Be patient. Green or yellow-orange peppers lack the floral complexity and fruity notes that make Habanadas special. Full maturity takes 100 days from seed, approximately 2-3 months from flowering.
Mark flowering dates on a calendar. This helps track maturity timelines. In total, expect 80-100 days from seed to harvest-ready orange peppers.
Proper Harvesting Technique

Never pull peppers off plants. The branches are brittle and break easily. Use clean pruning shears or scissors to cut peppers, leaving 1/4 to 1/2 inch stem attached. Alternatively, grasp the fruit firmly and twist gently while supporting the branch.
Harvest in the morning after dew dries but before heat stress peaks. Fruits have maximum turgor pressure and cut cleanly. This also reduces the chances of damaging heat-stressed branches.
Regular harvesting encourages continued production. Pick ripe peppers every 5-7 days once fruiting begins. This signals the plant to produce more flowers and fruits rather than focusing on seed production.
Extending the Season

When frost threatens but many peppers remain green, take action. Cover plants with row covers, blankets, or plastic on frost nights. Remove coverings during the day. Light frost (32°F) damages foliage but may not kill plants.
Harvest all fruits before a hard freeze (28°F or below). Green peppers at mature size can ripen indoors at room temperature. They won’t develop quite the same flavor as vine-ripened fruits but will be usable.
Container plants can be moved indoors to a sunny window. They’ll continue producing for weeks in warm, bright conditions.
Storage and Preservation

Fresh Habanadas store 1-2 weeks refrigerated. Ensure they’re completely dry before refrigerating. Store in the crisper drawer in a perforated plastic bag or paper bag for gas exchange. Check every 2-3 days and remove any showing decay.
For longer storage, freeze without blanching. Peppers are one of the few vegetables that freeze well without blanching. Wash and dry completely. Freeze whole, sliced, or diced in freezer bags with air removed. Frozen peppers maintain quality for 6-8 months.
Dehydrating concentrates flavors and extends shelf life to one year. Slice thinly and use a dehydrator at 125°F for 8-12 hours until brittle. Store dried peppers in airtight containers. Grind into flakes or powder as needed.
Pickling requires tested recipes. Peppers are low-acid vegetables. Improper canning can cause botulism. Use recipes with at least a 1:1 vinegar to water ratio. Bring vinegar, water, salt, sugar, and spices to a boil. Pour over peppers in sterilized jars.
Recommended Products
- Fiskars Micro-Tip Pruning Snips – Amazon B0001WVB4C. Sharp stainless steel blades make clean cuts without crushing tissue. Spring-loaded design reduces hand fatigue during harvest.
- FoodSaver Vacuum Sealer with Bags – Amazon B07MCD1TVW. Removes air to prevent freezer burn. Vacuum-sealed peppers maintain quality 2-3 times longer than zip-top bags.
- Nesco Food Dehydrator – Amazon B0090WOCN0. Adjustable temperature (95-160°F) allows precise 125°F drying. Five-tray capacity handles large harvests. Dried peppers retain flavor better than frozen.
Preserving peppers
Culinary Uses for Heatless Habaneros
Habanadas open culinary possibilities unavailable with traditional hot peppers. The tropical flavor shines without burning anyone out.
Fresh Applications

Raw Habanadas are excellent snacking peppers. Slice them for crudité platters with creamy dips. The natural sweetness plays beautifully against rich, fatty dips. Dice them into fresh pico de gallo or mango salsa for fish tacos. The fruity notes complement seafood perfectly.
Add them to salads for color and flavor without heat. Their tropical profile works in fruit salads as well as green salads. Try them with citrus, avocado, and jicama for a refreshing summer side.
Cooked Dishes

Roasting or charring Habanadas deepens flavor and adds smokiness. Blister them in a hot skillet with a little oil. Top with sea salt for a simple appetizer. The smoky, fruity flavor is addictive.
Sauté Habanadas with shallots in butter as a side dish. The sweetness caramelizes beautifully. Use them in stir-fries, fajitas, and soups where you want pepper flavor without heat.
For stuffed peppers, their 3-4 inch size is perfect. Halve them, fill with burrata cheese, top with bacon crumbles, and bake until cheese melts. The combination is restaurant-quality.
Sauces and Condiments

Habanada hot sauce provides complex flavor with zero heat. Families with kids love it. Ferment fresh peppers with 3% salt brine for 1-4 weeks before processing. The fermentation develops umami and tangy notes.
Blend roasted Habanadas into fresh salsas. Infuse them into oils for salad dressings. The fruity notes work in vinaigrettes. Some adventurous chefs make Habanada sherbets and jellies, leveraging the fruit-forward flavor.
Chefs report that Habanadas can be used liberally in recipes where traditional habaneros would be overpowering. This allows the pepper to star rather than just add heat.
Leave a Reply